Run AgentGateway on Windows in 10 Minutes (Binary, No Build)
No Rust, no Docker, no compiling. Grab the Windows binary, write a tiny config, and watch a real MCP tool server show up in your browser.

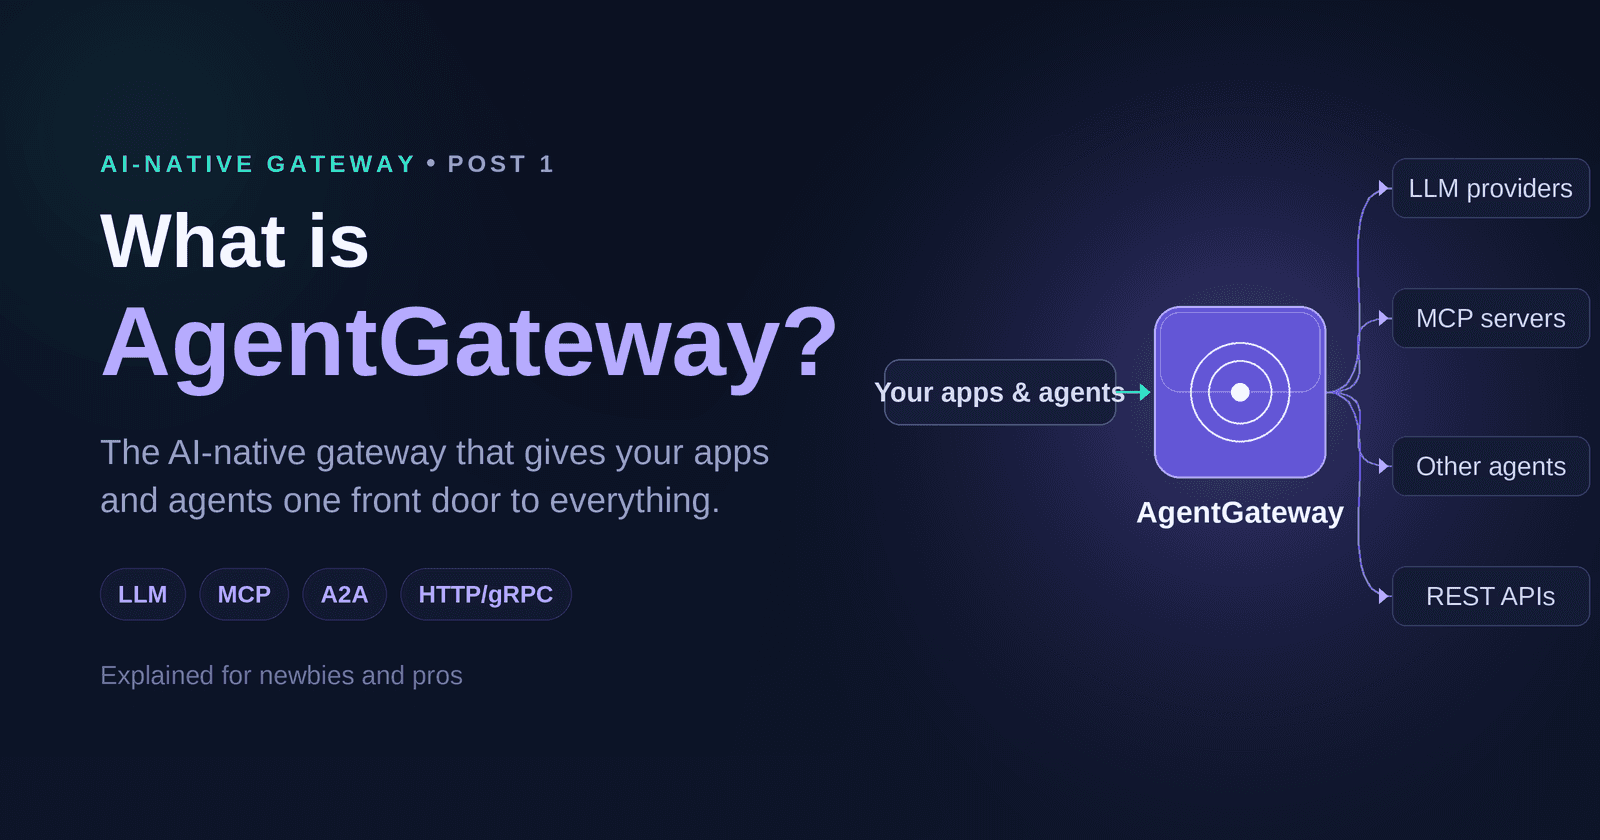
In Post 1 I went through what AgentGateway actually is: one Rust binary that can act as an LLM gateway, an MCP gateway, an A2A gateway, or a plain HTTP/gRPC proxy, with the auth and observability the raw protocols leave out. That post was all concepts and diagrams. This one is the opposite. We're going to get it running on a Windows machine and prove it works, and we're doing it the lazy way: download the prebuilt binary and go. No cargo build, no Docker image, no WSL required.
By the end you'll have AgentGateway sitting on port 3000, fronting a small MCP "everything" server, and you'll be able to browse its tools in your browser. That's a genuine first win you can build everything else on top of.
What you need first
Honestly, not much:
Windows 10 or 11.
Node.js installed, because the example tool server runs through
npx. Ifnode --versionprints something in PowerShell, you're set. If not, grab the LTS from nodejs.org and reopen your terminal.A browser.
That's the whole list. You do not need Rust, and you do not need Docker for this. The "10 minutes" assumes Node is already there. If you're installing Node from scratch, add a few minutes for that.
A quick honesty note about the version: I'm using AgentGateway v1.2.1, the current release at the time of writing (June 2026). Pin to whatever v1.x you actually download and write the version down somewhere, because config schemas do shift between majors and you want your notes to stay reproducible.
Step 1: Grab the Windows binary
Head to the releases page:
https://github.com/agentgateway/agentgateway/releases
Open the latest release and look at the assets list. You want the file that has windows in its name and matches your CPU. In our case, I prefer to use the latest stable release of v1.2.1 (agentgateway-windows-amd64.exe).
You might see the bash one-liner from the docs floating around:
curl https://raw.githubusercontent.com/agentgateway/agentgateway/refs/heads/main/common/scripts/get-agentgateway | bash
That works great in WSL, Git Bash, macOS, or Linux. It does not run in plain PowerShell or CMD, since it's a shell script. We're going native Windows here, so we're skipping it and just downloading the asset by hand.
If you'd rather not click through the browser, PowerShell can pull a release asset directly. Open the release in your browser once to copy the exact asset URL, then:
# Example only - paste the actual asset URL you copied from the releases page based on the latest version.
Invoke-WebRequest -Uri "https://github.com/agentgateway/agentgateway/releases/download/v1.2.1/agentgateway-windows-amd64.exe" -OutFile agentgateway.exe

However you get it, you should end up with agentgateway.exe in a folder. I dropped mine in D:\agentgateway\ and ran everything from there. You can add that folder to your PATH later if you want to call it from anywhere, but for a first run it's fine to just cd into it.
Step 2: Confirm it actually runs
Before writing any config, make sure the binary starts. From the folder with the exe:
.\agentgateway.exe
With no config file, AgentGateway boots with an empty configuration and brings up only its admin interface. Open this in your browser:
http://localhost:15000/ui
If you see the admin UI, the binary is healthy and we can move on. Port 15000 is the admin port and it's separate from whatever port your actual proxy traffic will use. Keep that distinction in your head, it saves confusion later. Stop the process with Ctrl+C.
If you're seeing the output like in the browser UI, do not panic and it is expected. It says, there is no valid configuration found and we will resolve this issue shortly.

Step 3: Write the config
Make a file called config.yaml in the same folder. This is the project's basic MCP example, more or less verbatim:
# yaml-language-server: $schema=https://agentgateway.dev/schema/config
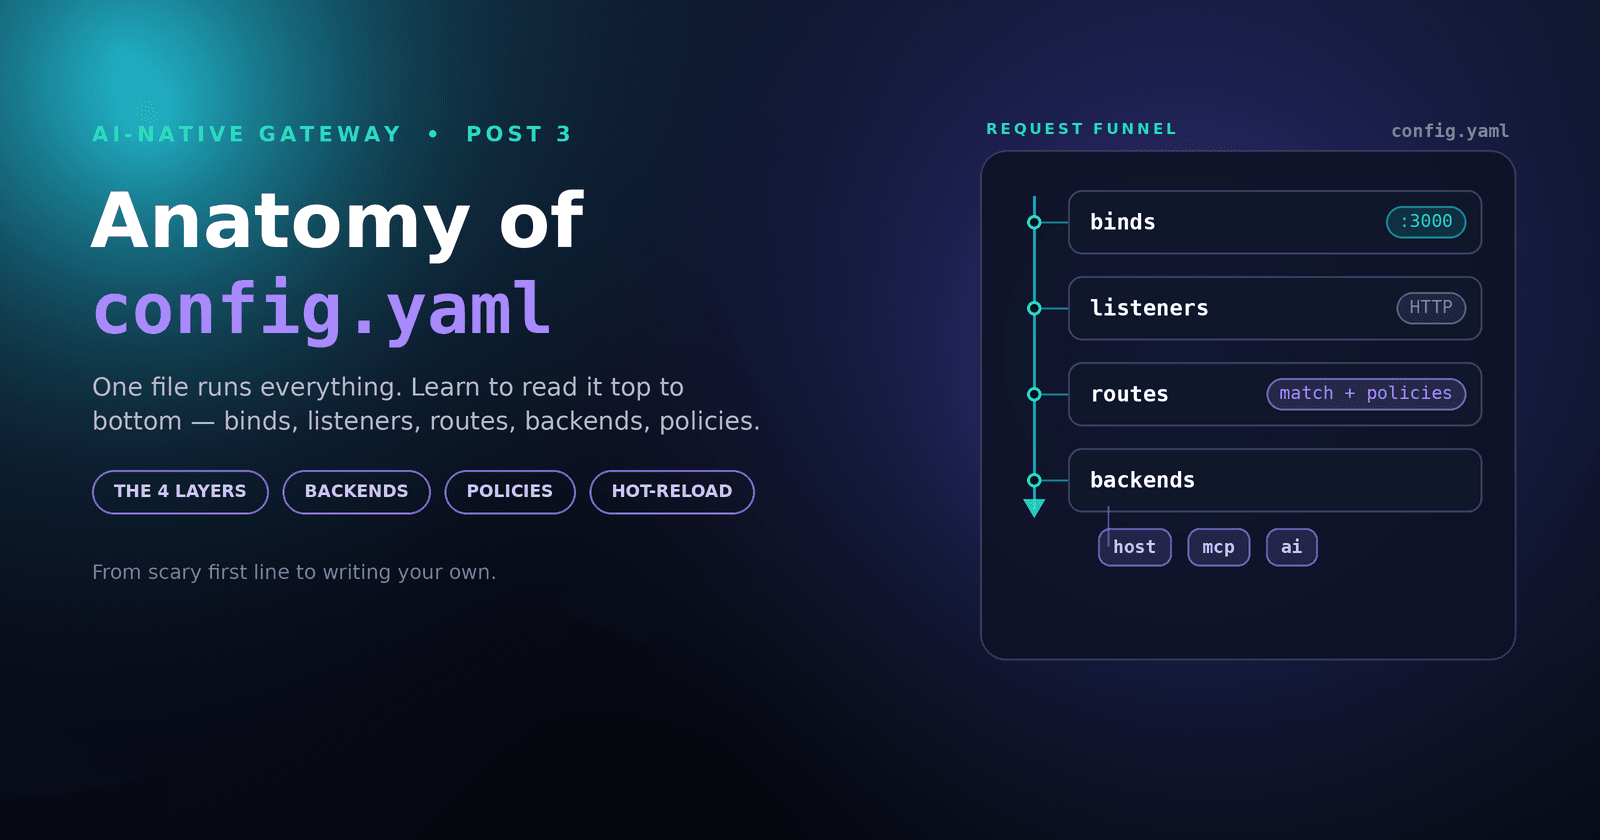
binds:
- port: 3000
listeners:
- routes:
- policies:
cors:
allowOrigins:
- "*"
allowHeaders:
- mcp-protocol-version
- content-type
- cache-control
- mcp-session-id
exposeHeaders:
- "Mcp-Session-Id"
backends:
- mcp:
targets:
- name: everything
stdio:
cmd: npx
args: ["@modelcontextprotocol/server-everything"]
Reading it top to bottom: binds is the port we listen on (3000). Inside it a single listener holds one route, the route carries a CORS policy, and the route points at a backend of type mcp. That backend has one target named everything, which AgentGateway launches by running npx @modelcontextprotocol/server-everything over stdio. So the gateway doesn't connect to some remote server, it spawns the tool server itself the moment a client shows up. I unpacked binds/listeners/routes/backends properly in Post 1 if you want the longer version.
Two things worth pointing at. First, that schema comment on line one is doing real work: if you've got the YAML extension in VS Code, you get autocomplete and red squiggles when you typo a field. Worth having. Second, the CORS block isn't decoration. The browser-based inspector we're about to use won't connect without those MCP headers allowed, and a missing mcp-protocol-version is one of the most common "why won't it connect" issues people hit.
If you don't have npx for some reason and you do have Docker, the same target can run the container instead:
stdio:
  cmd: docker
  args: ["run", "--rm", "-i", "mcp/everything"]
Step 4: Run it for real
.\agentgateway.exe -f config.yaml
The -f flag points it at your config. You'll see startup logging scroll past: it binds on :3000, the admin UI stays on :15000, and the everything target gets registered. Leave this terminal running. That's your gateway.

Step 5: See the tools
Two easy ways to confirm it's working, and neither one is pasting localhost:3000 into a browser.
The no-install option is the gateway's own admin UI at http://localhost:15000/ui. It has a built-in Playground that connects to your MCP server and lists its tools right in the browser. Open it, pick your route, click Connect, and the everything tools appear. Honestly this is the fastest path, and I tour the rest of that UI further down.
The other option is the MCP Inspector, worth knowing because it's the standard client every MCP tutorial reaches for. In a second terminal:
npx @modelcontextprotocol/inspector

It'll print a local URL and open in your browser. Point it at your gateway's streamable HTTP endpoint:
http://localhost:3000/mcp

http://localhost:3000/sse

Wait, why does /mcp look broken in my browser?
Here's the part that confused me for a solid few minutes, and I suspect it'll catch you too. The natural instinct after starting the gateway is to paste http://localhost:3000/mcp straight into the address bar to "see it." Don't expect a page. You'll get this instead, both on screen and in your gateway logs:
http.path=/mcp http.status=406 protocol=mcp error="mcp: client must accept text/event-stream" reason=MCP
A 406 with client must accept text/event-stream reads like a failure, but it's the gateway working correctly. /mcp isn't a web page, it's a protocol endpoint that speaks the Model Context Protocol over HTTP. The streamable HTTP transport requires the caller to send an Accept: text/event-stream header. Your browser, asking for a normal page, sends Accept: text/html instead, so the gateway politely refuses with a 406. You'll also see a second 406 for /favicon.ico right after, because the browser auto-requests the favicon and it hits the same route. Both are expected.
Now try http://localhost:3000/sse in the browser and you get the opposite experience, the page just hangs with something like:
event: endpoint
data: /sse?sessionId=dbaef4fe-a37b-4b9c-8d9f-424891e375e2
That one renders because SSE is text/event-stream, which browsers understand, so the connection stays open and shows you the first handshake event. It's still not a UI. It's the older SSE transport handing a client the session-specific URL it should post messages to. Interesting to look at once, then close the tab.
So the rule to remember: port 3000 is machine-to-machine, not for eyeballs. Reach it through a client (the Inspector, Claude Desktop, Cursor) that sends Accept: text/event-stream for you. The thing you actually look at in a browser is the admin UI on port 15000. The Inspector connects to the exact same /mcp URL your browser choked on, and it works, because it speaks MCP and your browser doesn't.
A quick tour of the admin UI
Open http://localhost:15000/ui and you get a left sidebar with seven sections. Here's what each one is for, in plain terms. The little number next to a few of them is just how many of that thing your config defined, so right now Listeners, Routes, and Backends each show 1.
Home is the dashboard. A glance at what's running: your port bindings and the listeners you've configured.

Listeners are your entry points. Each one is a port and protocol the gateway accepts traffic on. Yours is the single bind on port 3000.

Routes are the matching rules. A route decides which incoming requests it handles and forwards them to a backend. You've got one catch-all route from the config.

Backends are the destinations. Where matched traffic actually goes. Yours is that one
everythingMCP server.

Policies are the rules layered onto routes and listeners: CORS, authentication, rate limits, header transforms, and the like. The CORS block you wrote earlier shows up here.


Playground is the built-in test client, and probably the thing you were hunting for when you opened
/mcpand got nothing. Select your route, hit Connect, and it lists the live tools straight from your MCP server so you can call them in the browser. No external tooling.

CEL Playground is a scratchpad for CEL expressions. CEL is the little expression language AgentGateway uses inside policies. You type an expression, paste some sample input, click Evaluate, and see the result against the gateway's real CEL runtime before you trust it in a config.

That's enough to find your way around. The first five sections are mostly there to show and edit what's in your config.yaml. The two Playgrounds are the interactive ones, and they're rich enough that I'm giving them their own post later in the series, with real expressions and a proper test workflow rather than a one-liner each.
The stuff that actually bit me
Configuration Error : When I saw this at first, I got scared that something went wrong and later realized there is no valid configuration file found.
406/ "client must accept text/event-stream" when I open the URL. You opened/mcpin a browser. That endpoint isn't a web page, it's MCP over HTTP, and it needs anAccept: text/event-streamheader your browser doesn't send. Not a bug. Use the Inspector for/mcp, and use port 15000 for anything you want to view in a browser. There's a full breakdown of these logs above.npxnot found. Node isn't installed, or it's installed but the terminal you opened predates the install. Close the terminal, open a fresh one, retry. PATH only updates for new shells.Inspector connects then immediately drops. Almost always CORS. Make sure the
allowHeaderslist in your config includesmcp-protocol-version. People copy a trimmed config and lose that line."Port 3000 is already in use." Something else grabbed it (a dev server, usually). Change
port: 3000to3001in the config and use the new port in the inspector URL.SmartScreen won't let the exe run. Covered above: "More info" then "Run anyway," or unblock it in the file's Properties dialog.
The bash install one-liner does nothing in PowerShell. Right, it's a shell script. Either download the asset manually (what we did) or run that command inside Git Bash or WSL.
Where this leaves you
You now have a working AgentGateway on Windows that you set up without compiling a thing, and you've watched it broker a real MCP session. Everything else in this series builds on exactly this setup: same binary, same config.yaml, just more interesting backends and policies.
Next post: instead of one demo server, we point AgentGateway at two or three real MCP servers at once and expose them through a single endpoint, so your IDE or agent gets every tool from one URL. That's where the "gateway" part starts earning its name.
Setup I used: AgentGateway v1.2.1 (binary), Windows 11, Node.js 20 LTS, MCP Inspector via npx.
Handy links
Quickstart: https://agentgateway.dev/docs/standalone/latest/quickstart/
Connect to MCP servers (Streamable HTTP): https://agentgateway.dev/docs/standalone/latest/mcp/connect/http/
Releases (binaries): https://github.com/agentgateway/agentgateway/releases
MCP Inspector: https://github.com/modelcontextprotocol/inspector